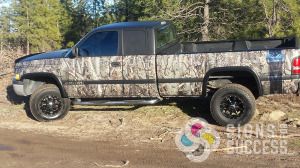
John’s Camo and Matte Truck Wraps
People love to personalize their stuff. We’ve wrapped personal golf carts, a go cart, and an ice rink Zamboni, not to mention hundreds of cars, trucks and boats, and each project has its own story. In the case of John’s camouflage and matte black truck wrap, the wrap design evolved from a simple camo truck wraps into something much more unique. After seeing the matte black color change vinyl at a show in Las Vegas, Signs for Success owner John Bogensberger couldn’t wait to try it out.
The Design
The matte black vinyl was cleverly worked into the camo wrap design by adding striping to the hood and sides of the truck. The entire top of the cab is also wrapped with pre-laminated Avery Supreme Wrapping Film in Matte Black. The Oak Ambush camouflage pattern was printed directly to 3M High Performance Control Tac Vinyl and laminated with 8520 Matte Laminate. By laminating the camo with a matte laminate, we achieved a cohesive matte truck wraps.
Some unique features for this wrap included a black matte stripe running horizontally down the body with the “DODGE” logo reversed in camo, a wrapped-to-match bug shield, and the matte black grill.
The Installation
The installation was quick and easy with the aid of knifeless tape. When applying multiple layers of vinyl, knifeless tape creates a straight, smooth cutting line without the risk of scratching the paint underneath. This made the job easier since there were many instances where specific pieces of the wrap needed to be cut on the vehicle to match the body lines of John’s truck.
Installation with two different materials is similar to the installation process with just one. For any successful installation, we first prep the surface by cleaning the vehicle and wiping down with alcohol. Then we remove any pieces like side mirrors, taillights, bumpers, and emblems. We try to follow the 5 minute rule: if it takes less than 5 minutes to remove and gets an obstacle out of the way, we do it.
Because there were multiple layers with this truck wraps, installers started at the bottom of the truck and worked their way up. That way, the seams are overlapped in a way that allows any dirt or drainage to easily run off rather than build up at the seam edges.
To apply the vinyl on truck wraps, we simply place the vinyl where we want it, then start applying with a squeegee. A light releasable adhesive helps the vinyl stay put before heating, but also allows for repositioning if placement is a little off. We use the squeegee to press into all the grooves, following with a heat gun as we go, then reheat with the heat gun to set the material. Signs for Success wrap installer Rich Wilke explained, “when you bend, twist and stretch the vinyl, it gets tension; heating the vinyl again will release that tension.” We make sure all bubbles and wrinkles have been worked out before trimming off excess vinyl around door handles and any other features. Then we reassemble the parts that were removed.
To sum it up:
- Clean vehicle
- Remove any pieces you can (side mirrors, taillights, bumper, etc.)
- Place the vinyl where you want it
- Use squeegee to press into grooves
- Follow with a heat gun as you squeegee the material, removing all bubbles and wrinkles
- Reheat to set the material
- Trim excess material
- Replace any pieces that were removed for installation
This unique truck wrap captures both the urban and country sides of John by melding camo with matte black in an overall sleek matte design. Our experienced install team skillfully applied all the elements, and it still looks great two years later! contact us for a free quote on your wrap project.
Want to see how we did it?


